The polyester adhesive film is A Beautiful simulation of old hammered glass with European iron grill work providing semi-privacy.
The Baguette is 6" x 3", The diamond is 1" x 1".
Priced per ft. Order the length (quantity) needed x 58" Wide.
Durability ?
Recommended for high-traffic areas
Durability:
Every film has a recommended traffic area rating based on overall product durability and recommended installation location:
High Traffic Areas
Our most durable styles constructed for areas that experience regular contact with items and individuals.
Low Traffic Areas
Made from the same durable materials but with finishes that can be susceptible to scratching or damage from frequent contact.
Base Material
Polyester
Adhesion Type ?
Self-Adhesive
Adhesion Type:
Our films adhere to surfaces in one of three ways:
Self-Adhesive Window Films
Best for more permanent applications or high-traffic areas where a more durable, longer-lasting product is desired. Easily removable and replaceable.
DryApply Technology
Simply remove the protective backing on these products and squeegee directly onto the dry, glass surface. No solution needed to install the product.
Static Cling Window Films
These films are adhesive free, making them the most reusable. They can be removed and reinstalled with ease, won't leave behind glue residue, and can be placed on plastic, Plexiglas, and ordinary glass.
UV Rating ?
Level 3: 50-74%
UV Rating:
UV Rating's from 1 to 4 based on the amount of UV transmission allowed:
Level 1
0-24% UV Transmission (Blocks the most UV light)
Level 2
25-49% UV Transmission
Level 3
50-74% UV Transmission
Level 4
75-100% UV Transmission (Blocks the least UV light)
Environment ?
Indoor
Environment:
Our films are suitable for one of three applications:
Indoor
These films are perfect for all indoor areas in home and offices, including bathrooms with high moisture levels.
Indoor / Outdoor
These films can be applied to both interior and exterior surfaces.
Outdoor
These films are designed for outdoor use only and should be applied to exterior surfaces.
Privacy Level 1: Least Private
Most Visibility, offers the least privacy
Note: These privacy levels are intended as a general guide, and are based on an object being 18 inches behind the film. Viewing conditions will vary. Please request samples to determine if the film and privacy level are suitable for your application.
With the right preparation and installation, Decorative Films are a fast and easy way to transform a room. But don't skip steps or skimp on tools! For a beautiful and resilient end result, take your time, measure carefully, wet thoroughly and squeegee the entire surface.
Before you get started…
Make a wetting solution.
Wetting solution is the secret ingredient to a smooth, seamless installation. Make a solution by adding 8-10 drops of a mild, non-moisturizing dish detergent (Dawn or Joy; do not use hand soap) to a 32-oz. spray bottle filled with clean water (adjust ratio for smaller or larger bottles). More soap may be needed when applying film to acrylic surfaces. Mix well.
Make sure it's smooth.
To ensure the surface is completely clean and smooth before installation, spray the glass with the soapy water mixture and drag a single-edge razor across the surface. If you hear a clicking sound, there is something on the surface that will prevent full adhesion. Use a glass-safe scrub pad to remove the debris.
Make a workspace.
Give yourself enough space to work. You will need enough flat surface to lay out the film for measuring, cutting, marking and prep. Do not run a fan near the film or glass surface during installation. This can cause dust and debris to blow onto your film and become trapped. Window film performs best when it is acclimated to room temperature 24 hours before handling.
Steps
Step 1: Measure, Cut and Clean
Carefully measure the height and width of the glass surface. Cut the film to the dimensions, leaving an extra ½ inch to 1 inch around all sides. You'll be able to trim the edges down to size in the final step. You may use the paper liner on the back of the film to mark cut points; this will not damage the film. If you're unsure about measuring, make a paper template of your window and use it to measure and cut your film. Thoroughly clean the surface of the glass to remove any trace of dust, grime and grease. Use low-lint towels or microfiber cloths to clean the surface, as lint left on the glass can stick under film.
Step 2: Peel and Prep
Lay the film on a clean, flat surface with the liner facing up. Slowly peel back the liner, wetting the adhesive side of the film very thoroughly as you peel down. If you can't separate the liner from the film, place a piece of scotch tape on both sides of the sheet, fold the tape over to create tabs, and use the tabs to separate the two sides. If you are working with a large piece of film, it is helpful for two people to work together. After you remove the liner, rinse and dip fingers in water before handling the film. Wet fingers will prevent fingerprints on the adhesive surface.
Step 3: Get It Wet
Thoroughly spray and soak the glass surface AND the adhesive side of the film with the water mixture. Wetter is better! There is no such thing as too much water. The water will allow you to easily apply and reposition the film before you squeegee—and any excess water will evaporate as the film fully adheres.
Step 4: Apply and Smooth
Pick up the film by the top corners, keeping it straight and level. Place the wet film onto the wet surface, keeping the top edge level but letting the film hang over the edges of the frame on all sides. Move, slide and reposition the film as needed. The water should allow it to float and flow easily. Wet the outside of the film with the spray, then slide a squeegee over the wet film to smooth out and press the film against the glass. Squeegee from the center moving out, pushing bubbles and wrinkles out as you go.
Step 5: Trim and Finish
Double check that the film is flat and smooth. Locate the hard card and razor that were included with your film. If any bubbles remain, use the hard card to push them towards the edge. Then, in one smooth, continuous motion, trim the excess film from the edges using the hard card and a razor knife. Once the film is trimmed, wrap the hard card in a paper towel and use it to push any remaining bubbles and water to the outside edge. The film will completely dry and fully adhere within a few days.
Static Cling Installation Guide
With the right preparation and installation, static cling Decorative Films are a fast and easy way to transform a room. But don't skip steps or skimp on tools! For a beautiful and resilient end result, take your time, measure carefully, wet thoroughly and squeegee the entire surface.
Before you get started…
Make a wetting solution.
Wetting solution is the secret ingredient to a smooth, seamless installation. Make a solution by adding 8-10 drops of a mild, non-moisturizing dish detergent (Dawn or Joy; do not use hand soap) to a 32-oz. spray bottle filled with clean water (adjust ratio for smaller or larger bottles). More soap may be needed when applying film to acrylic surfaces. If you have hard water, consider using filtered or bottled water, to prevent mineral deposits under the film. Mix well.
Make sure it's smooth.
To ensure the surface is completely clean and smooth before installation, spray the glass with the soapy water mixture and drag a single-edge razor across the surface. If you hear a clicking sound, there is something on the surface that will prevent full adhesion. Use a glass-safe scrub pad to remove the debris.
Make a workspace.
Give yourself enough space to work. You will need enough flat surface to lay out the film for measuring, cutting, marking and prep. Do not run a fan near the film or glass surface during installation. This can cause dust and debris to blow onto your film and become trapped.
Steps
Step 1: Measure, Cut and Clean
Carefully measure the height and width of the glass surface. Cut the film to the dimensions, leaving an extra ½ inch to 1 inch around all sides. You'll be able to trim the edges down to size in the final step. You may use the paper liner on the back of the film to mark cut points; this will not damage the film. If you're unsure about measuring, make a paper template of your window and use it to measure and cut your film. Thoroughly clean the surface of the glass to remove any trace of dust, grime and grease. Use low-lint towels or microfiber cloths to clean the surface, as lint left on the glass can stick under film.
Step 2: Peel and Prep
Lay the film on a clean, flat surface with the liner facing up. All static cling films have a liner, but some are clear and hard to see at first glance. Make sure you remove the liner or the film will not adhere. Slowly peel back the liner, wetting the static side of the film very thoroughly as you peel down. If you can't separate the liner from the film, place a piece of scotch tape on both sides of the sheet, fold the tape over to create tabs, and use the tabs to separate the two sides. If you are working with a large piece of film, it is helpful for two people to work together. After you remove the liner, rinse and dip fingers in water before handling the film. Wet fingers will prevent fingerprints on the static cling surface.
Step 3: Get It Wet
Thoroughly spray and soak the glass surface AND the static side of the film with the water mixture. Wetter is better! There is no such thing as too much water. The water will allow you to easily apply and reposition the film before you squeegee—and any excess water will evaporate after the film fully clings.
Step 4: Apply and Smooth
Pick up the film by the top corners, keeping it straight and level. Place the wet film onto the wet surface, keeping the top edge level but letting the film hang over the edges of the frame on all sides. Move, slide and reposition the film as needed. The water should allow it to float and flow easily. Wet the outside of the film with the spray, then slide a squeegee over the wet film to smooth out and press the film against the glass. Squeegee from the center moving out, pushing bubbles and wrinkles out as you go.
Step 5: Trim and Finish
Double check that the film is flat and smooth. Locate the hard card and razor that were included with your film. If any bubbles remain, use the hard card to push them towards the edge. Then, in one smooth, continuous motion, trim the excess film from the edges using the hard card and a razor knife. Once the film is trimmed, wrap the hard card in a paper towel and use it to push any remaining bubbles and water to the outside edge. The film will completely dry and fully cling to the surface within a few days.
Step 6: Remove and Store
Static cling films can be easily peeled off, without damage to the film or glass surface. If you plan to reuse your film again (e.g. – for holiday-themed films), make sure to save your packing materials and store clean, dry film rolled up until the next application.
Frequently Asked Questions
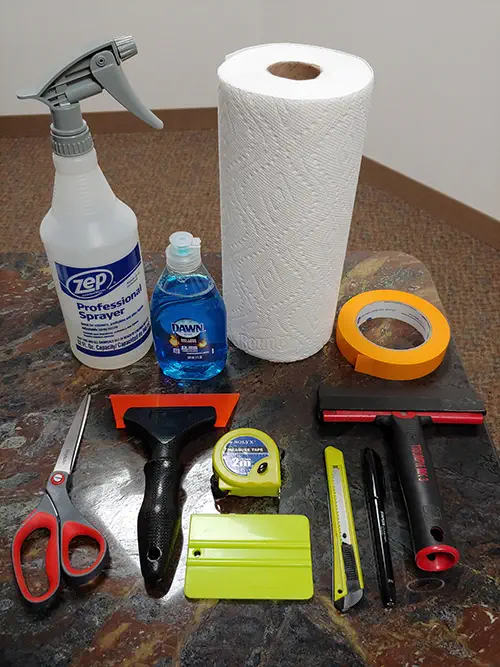
What tools will I need for installation? You will need something to clean the glass, a razor knife (included with your film), scotch tape, a squeegee, a credit card or hard card (included), a soap and water solution (see instructions for details), and a 32-oz. spray bottle (or adjust ratio for other sizes). To purchase an installation kit, visit our website at DecorativeFilm.com.
Tools: Scissors, Tape Measure, Razor Knife, Ruler, Plastic Card Squeegee, Spray Bottle, and Paper Towel.
Can film be installed on the outside of a window?
With the exception of films specifically labeled and made for exterior application, always install film on the interior of a window. Film applied to the exterior will easily fail due to exposure to the elements.
How do I work with film that is curled?
Because the film is rolled for shipping, it may be slightly curled prior to application. For best results, unbox, unroll and let all films come to room temperature on a clean, flat surface for 24 hours before installation. This will allow the film to relax. If the edges of the film continue to curl after installation, wrap your squeegee in a few layers of paper towel and push the edges of the film down, moving from just inside the edge to just outside. If the edges continue to curl, turn a hair dryer to the warm (not hot) setting, hold about 8-12 inches away from the film to evaporate any excess moisture, and repeat the squeegee process.
Can film be installed on plexiglass, polycarbonate or acrylic?
Yes, most films can be installed on plexiglass, polycarbonate or acrylic surfaces. But unlike glass, some of these materials expand and contract with temperature changes and emit gas—which may cause air bubbles to form between the film and the surface. Use more soap in your wetting solution when installing on these surfaces.
Can film be installed on textured glass?
No. Film will only correctly adhere to flat, smooth surfaces.
Can film be installed on double-pane windows?
Yes. With the exception of some blackout films, all our films are safe for installation on double- or triple-pane windows.
How do I clean the film after installation?
Use any non-ammonia widow cleaner and a microfiber cloth. We recommend SimGlass® Window Film Cleaner, which is available for purchase on our website. Make sure any cleaning professionals are notified that you have films on your windows.
How do I remove film?
All films can be easily removed without any damage to the glass. Begin by peeling the film away from one corner of the glass and pulling down until the entire panel is removed. If any adhesive remains, it can be easily removed with window cleaner, soapy water or a single-edge razor blade.
How do I place seams?
Before you do any actual cutting, you should consider where to place the seam on the window. You will usually have options when deciding: do you want it vertical or horizontal? Higher or lower? It may depend on the width of the roll you are working with, but generally you'll want to place it where it is least noticeable. If you have tall windows, placing it at the top will make it harder to see. If it is darker at the bottom or people tend to look toward the top more often, then placing it at the bottom will be the best method.
How do I cut the seam?
The second factor to consider when doing this technique properly is the cutting. Some customers try to cut the two pieces as true as possible with a straight-edge, then line them up and install. Or, they make sure to use the factory edges of the film when ”butting” the two ends together. This can work well, but most times it is difficult to cut the film perfectly straight, or using the factory edges creates too much waste. The best method to splicing is to overlap the two pieces about 1/2” where they meet. Install the entirety of the pieces, then use a sharp blade to cut down the center of the overlap. Since the pieces are installed and adhere firm on the window, they shouldn't move or peel while you are slicing. Remove the sliced strips of film and you are left with a tight seam.


